With current circumstances across the world, face coverings continue to be a part of our daily lives. I’ve been wanting to make an alternative fashion mask for a while now, but lately I have been strictly wearing to KN95 masks. I feel safe in these masks, but they’re rather boring looking when compared to the endless possibilities of colors and prints when making cloth masks.
Scroll to the bottom of this post or click here to view my short video tutorial.
Disclosure: Some of the links in this post are affiliate links. This means if you click on the link and purchase an item, I will receive an affiliate commission at no extra cost to you. As an Amazon Associate I earn from qualifying purchases. I only recommend products I truly support. All opinions remain my own.
One of my favorite content creators, Downtown Tailoring, shared a pattern for their KN95 cover and free downloadable pattern. As soon as I saw it, I knew I wanted to give it a try. You can find a link to their full YouTube tutorial here. Be sure to get their free pattern while you’re there!

I made my own cover following their pattern and instructions. I am pairing my cover with these black KN95 masks. Below you can see how the cover fits over the mask. This design is so clever!

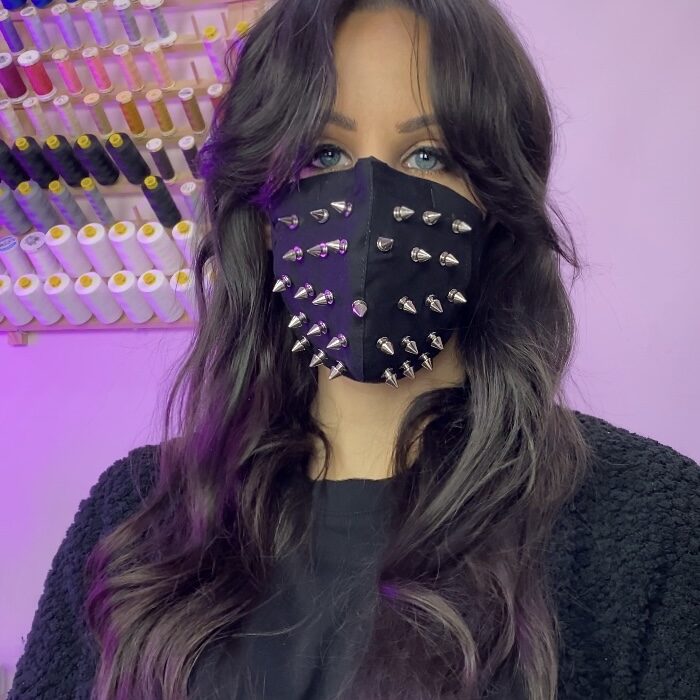
The cover is great as it is. However, I wanted to add a little bit of spice by adding metal spikes to my cover.

I also decided to add a nose wire to my mask. To achieve this, I first cut a 1 inch by 4 inch strip of fabric on the bias. Then I turned all of the raw edges under by 1/4 inch and pressed.

Next, I sewed the strip to the wrong side of my cover across the nose area. I left one small side open so I could insert a wire, then I stitched it closed. For more on my wire technique, check out my pleated cloth mask sewing tutorial.

I started out by marking dots where I wanted to place each spike using erasable wax tailor’s chalk.

Using this awl made by Dritz, I pierced through both layers of fabric to create a hole for the spike. Be careful using the awl because it is quite sharp!

After making each hole, I placed a few drops of Fray Check to prevent the holes from becoming frayed over time.
Once the Fray Check was dry, it was time to start installing the metal spikes. Each spike comes in two pieces: a screw back and the spike itself. I used a small screw driver to make sure the spikes were installed nice and tight.

Here’s what my final mask cover looks like. I plan to hand wash this mask cove and lay it flat to dry. For deep cleaning, I would recommend removing the spikes prior to washing.

I really love how this mask cover turned out. I definitely think it says “Keep your social distance!”
If you make a spiked mask like this one, tag me on social media @SincerelySews. I would love to see your creation!


